Thursday, November 14, 2013

Moon Sugar Decals Review

*This product was provided for my honest review. All of the opinions in this post are mine*

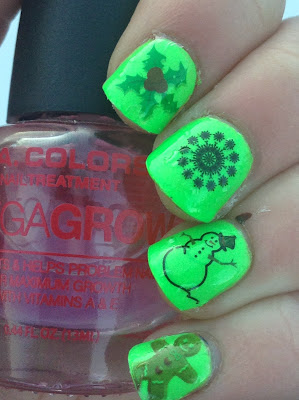
Hey guys! Today I have some decals from Moon Sugar Decals for your viewing pleasure! So I picked up the Christmas nail decals. I saw them and thought they were the cutest little things ever. I mean look at these!

I also got the breast cancer awareness ribbons as a added bonus! I know its a little early for Christmas stuff because Thanksgiving is still 2 weeks away, so don't hate me.

Along with these being super cute, they were really easy to apply. I haven't tried too many nail decals but these were the best of the ones that I have tried. I cut them out, dripped them in warm water for about 10 seconds, slide the decal of the paper, and put them on my nails. I had time to move them for about a minute or two before they dried, which is plenty of time. Then topped them with top coat.

I put them over China Glaze's I'm With The Lifeguard since they are best over light or bright colors. What can I say, I mean I love them! They will totally be going on my Christmas manicure this year!


I think the snowflake is my favorite! But the snow man is a close second!


 So yes, I haven't already made this straight, go and get some of these! You won't be disappointed! You can get them here. Most of them are $3.31 with free shipping. That's a pretty great price for decals of this quality. Let me know which one is your favorite in the comments below. Have a great day everyone!

Wednesday, November 13, 2013

Nail Polish and Nail Art Items Organization & Swatch Book

Hey! Today I figured I would show you all how I organize all my polish related items. I used to have a ton of different random racks for my polish. But then that got pretty old, because they didn't match at all. So now they are in a few bins until I get my dad to help me make my 6 foot tall, dream nail polish rack. I'm hoping that we will go buy the supplies this weekend. So here is my temporary storage for my 150+ bottles of polish.

So I have all of my e.l.f. polishes in the top green bin and the rest of them in the bottom clear bin.

Basically right next to my polishes I have a shelf for all my nail art stuff.

So I did a really really crappy painting job on this shelf, then put flower fabric on the shelves. On the top shelf I have all my nail tape. Next shelf has all my stamping stuff. Next has a bunch of random nail art items like beads, glitter, nail art pens, and stickers. Next shelf has all my nail care items. The bottom shelf has cosmetic sponges for gradients and vaseline for easy clean up for water marbles!

And right below that shelf I have my acetone, polish remover, base and top coats, water marbling container, tweezers, brushes, dotting tools, and my fake nails that I use when I break one of my naturals.

I just recently made a nail polish swatch book for finding the right color for nail art. It is super fun and easy to do. Plus with my bins, the colors aren't all layed out, so this book helps a lot. You can make yours how ever you want but I put mine into color categories. I also used a binder so when I run out of space for a color, I can just add a new page.


I used some scissors and cut out some polish bottles and brands from the Nail It! Magazine. Im not done yet because they didn't have enough ads (which is a good thing). So when I get the next issue, I will add to it! I have a red, orange, yellow, green, blue, purple, nude, and other category. Pretty straight forward!

When I finish that rack, I will put up another post! Have a great day everyone!


Sunday, November 10, 2013

Essie Butler Please Swatches

Hey guys! How has your weekend been? Mine was great! I went and visited some family in Wisconsin! I had a blast.

Today I have swatches of Essie's Butler Please. All I can say is thank you Kohl's! They send out a $10 gift every month or so and I always use it to get some Essie! I really love this color. This polish is from Essie's 2012 Winter Collection! It is a really pretty purplish blue that dries matte. I was kind of surprised when I saw that it was heading to the matte direction, but it was a good surprise. Here are the swatches:

No Top Coat:


With Top Coat:


Thanks for reading! Have a great day.

Monday, November 4, 2013

Target Haul Swatches & Review

Hey guys! I guess that I wouldn't really call this a haul because I only got two polishes, but what else could I say? I got Maybelline Mystic Green and NYC Plaza Plumberry. Both are beautiful in my opinion. But the funny thing is that Plaza Plumberry seemed to have a better formula. It went on great and Mystic Green had some formula issues. Even though Plaza Plumberry was .97 and Mystic Green was around $3.00. But here they are.

NYC Plaza Plumberry:

Plaza Plumberry is a dark dark purple. Its beautiful and I don't have anything like it. The formula was great and it went on perfectly. Here is two coats with top coat.


Maybelline Mystic Green:

Mystic Green is a duochrome bluish green. I saw this one at the store and was like "that isn't holographic at all?" Unless I'm getting holographic wrong, they are supposed to have some rainbows. I see no rainbows. But I love the polish anyway. I took a lot of different pictures of this one because its changes colors in different lights. The formula was okay. It didn't dry very well though and it was a little thin but its all good. Here is two coats with top coat.


Saturday, November 2, 2013

Sinful Colors Gorgeous Swatches & Review

Hey! Today I have a beautiful duochrome from Sinful Colors for you guys! Its called Gorgeous. What a good name for this polish! I saw this polish in Target and was automatically sure that I was going to buy it. It reminds me a lot of mermaids. I don't know why or anything. But it is either blue, aqua, or green in different lights.

The formula was kind of iffy. Just like most of the Sinful Colors polishes. They are only 2 dollars. So I guess that I didn't expect anything different. But I did only have to use 2 coats, so that was a plus. Plus this color is worth all the troubles. Here is two coats with top coat.


Thursday, October 31, 2013

Happy Halloween!

Happy Halloween! Each of my nails is a different halloween theme today, for the ultimate Halloween manicure. I am going trick or treating tonight with some cousins even though I'm 15. I think that you can go trick or treating until the end of highschool, but a lot of people think different. What do you guys think?

On my left hand going from thumb to pinkie I have dripping blood, a pumpkin, a mummy, a ghost, and candy. On my right hand I have a really bad black cat, fangs, splattered blood, frankenstein, and a candy corn gradient.


For my right hand I used Elf Desert Haze, Revlon Diva, Sally Hansen Sun Kissed, Sinful Colors Black on Black, NYC French White Tip, and Sally Hansen Mellow Yellow.


For my left hand I used Sally Hansen No Hard Feelings, Sinful Colors Black on Black, NYC White Tip, Revlon Diva, Pure Ice Wild Thing, Sally Hansen Sun Kissed, and Sally Hansen Mellow Yellow.

Thanks for reading! What do you think? If you want, share links to your Halloween nails below. Have a fun and safe Halloween!

Monday, October 28, 2013

Water Marble Tutorial

Okay, I admit it. I have been putting off a water marble tutorial for a LONG time. Truth is, I hate water marbling. It is pretty in the end, but it is a really messy process. But here it is, finally! Here are all the supplies you will need:

  • Cup or container
  • Filtered or bottled water
  • 2 of more polishes
  • Base & Top coat
  • Polish remover
  • Q-tips
  • Toothpicks
  • A lot of time on your hands
Okay, here we go!

Step one: Paint your nails white.

Step two: Fill your cup up with water. Make sure you use filtered or bottled water because it helps the polish spread.

Step three: Take your polish and drip a bit of polish on the water. Get pretty close to the water or the drop will sink to the bottom.


Step four: Keep dropping the polish, alternating colors.


Step five: Take your tooth pick and lightly drag it against the polish making whatever design you like.

Step six: This step is optional but if you put tape over your finger (not the nail) then clean up will be much easier.

Step seven: Dip your nail over the design you like and keep it there.


Step eight: With your finger still in the water, take your tooth pick and swirl it in the water to get all the excess polish then pull your finger out. 


Step nine: Take the tape off and clean up with your acetone and Q-tips. Then put top coat on and your done!

Thanks for reading! If you have any questions or comments, let me know in the comment box!

Copyright © 2014 A Polished Bookworm