Showing posts with label free hand. Show all posts

Tuesday, October 6, 2015

#31DC2015 Day 26 Inspired by A Pattern

Hello friends. In my attempts to catch up with the 31 Day Challenge, I have day 26 today. Day 26's prompt is "inspired by a pattern". I have been seeing all of these pineapple patterns everywhere and really wanted to try it. I also added a gradient and a water marble to it.

Polishes:
  • NYC French White Tip
  • China Glaze Community
  • NYC Palm on The Beach
  • China Glaze Metro Pollen-Tin
  • Seche Vite Top Coat


Thursday, September 24, 2015

#31DC2015 Days 21 & 22

Hi guys! In the midst of applying to colleges, applying for financial aid, and other gross adult things, I come to you with more of the 31 Day Challenge. Remember when you were a kid and you really just wanted to be an adult, yet every adult told you to stay a child because being an adult sucks? I was that way. Now I just want some candy and a nap.


Day 21 Inspired by A Color
  • Sally Hansen Wine Not
  • China Glaze Mingle with Kringle
  • O.P.I. I Sing In Color
  • Gold stud from The New Black
  • inm Out The Door top coat


Day 22 Inspired by A Song

 Inspired by Welcome to the Black Parade by My Chemical Romance
O.P.I Push and Shove, NYC Black Lace Cream, & NYC French White Tip.
Top coat is Seche Vite.  


Monday, September 14, 2015

#31DC2015 Day 14 Flowers

Hey guys! Today is the 14th day of the 31 Day Challenge. Today's prompt is flowers. I was partly inspired by Wondrously Polished for this look. I painted this design free hand. I am way to lazy to name all of the polishes I used for this but if you want to know, leave me a comment.


Sunday, September 13, 2015

#31DC2015 Days 12 & 13

Yes!! I'm finally caught up on the challenge. Today I have yesterday's prompt which was stripes and today's prompt which is animal print. I also find myself stuck on animal print, not because there aren't a ton of choices because there is, but I also want to be original. Today I just said screw it and did a nice typical cheetah print.

Day 12 Stripes

Polishes used: 
  • China Glaze Flip Flop Fantasy
  • China Glaze The Heat is On
  • China Glaze Mingle with Kringle
  • China Glaze Pinking Out the Window
  • Seche Vite Top Coat


Day 13 Animal Print

I used China Glaze The Heat is On, China Glaze What's She Dune?, and NYC Black Lace Cream. Top coat is Seche Vite. 


Thursday, July 23, 2015

Simple Geometric Nail Art

Hey guys. Today I just wanna show you some nail art I did about a week ago. I hope you are having a good week.


The base for this nail art is Orly Highlight. I painted this free hand with nail art brushes. Also for the bigger rectangles I just used the nail polish brush. The colors I used for this design are: Nicole by O.P.I. Hit The Lights, O.P.I Suzi Has a Swede Tooth, O.P.I. My Paprika is Hotter Than Yours!, and O.P.I. Vant to Bite My Neck?. I topped it off with Seche Vite top coat.


Saturday, July 18, 2015

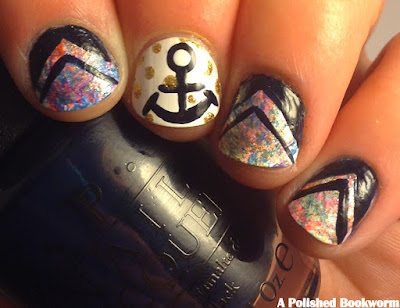
Tutorial: Anchor Nail Art

Anchor Nail Art Tutorial

Hey guys! I have spent so much time blogging about books lately and it's time to get some balance in here. So today I have a nail art tutorial for you. I have been trying to make more tutorials lately because people typically like them better then just a regular post. You will probably see more tutorials coming in the following months. Today I wanted to bring you a tutorial appropriate for summer: an anchor tutorial!

What You Will Need:
  • A dark navy blue polish. I'm using O.P.I. Incognito in Sausalito
  • A white polish. I'm using NYC French White Tip.
  • A gold polish. I'm using China Glaze Mingle with Kringle. 
  • A dotting tool (You can also use a bobby pin or a pencil!)
  • A nail art brush or any small paint brush. 
  • Top coat. I'm using Seche Vite.  
  • Glue or liquid latex. This is totally optional. You see all that gooey stuff on my fingers? That's glue for easier clean up. So when its dry I just peel it off. 
  • Clean up brush and nail polish remover. 
Step One:

1. Paint your nails white and place a big dot on your nail as shown above. 
Step Two:


 2. Place a smaller dot with white in the middle of your navy dot. 

Step Three:

 3. Paint a "t" coming off of your circle. All you are really doing is painting a line down from your circle and then painting another in the middle of that line. 

Step Four:

4. Paint a curve at the bottom of your nail connecting to your line. Then paint two lines on both sides of the curvy line. It kind of looks like a smiley face. 
 
Step Five:

 5. Use your dotting tool to make gold dots all around your nail. You can see that some of my dots go over the anchor but if you don't want that it's fine! To fix that you could go over part of the dot, where the line should be, with your navy polish. 

6. Clean up around your cuticles and finish with top coat!

Anchor Nail Art Tutorial

If you have any suggestions for new tutorials please leave them in the comments! Thanks for reading and if you recreate this anchor with my tutorial feel free to show me on any of my social medias. 

Sunday, June 28, 2015

Nailing The Book: A Court of Thorns and Roses Nail Art

Hey guys! How are you all doing? I'm doing really well because my cousin is staying with me for a few weeks. She is like my best friend and we are having a lot of fun.

Today I'm doing another addition to the nailing the book series. Today's addition is inspired by A Court of Thorns and Roses by Sarah J. Maas. She is the author of the Throne of Glass series and her new series called A Court of Thorns and Roses. She is personally one of my favorite authors! You can find the Goodreads page for A Court of Thorns and Roses here.

My base for this nail art was Rimmel London Red, Steady, Go. I drew all of it free handed with a nail art brush. The silver is O.P.I. Push and Shove. The black is NYC Black Lace Cream. I finished it off with Nicole by O.P.I. Fast Drying Drops.


Friday, June 26, 2015

Tutoral: How to Make Sheer Black Polish + Sheer Outline Design


I can't even remember the last tutorial that I did. It has been far too long. So today I want to show you guys how to do this fun, gothic design! I'll show you how to make a sheer black polish and how to do this polka dot / outline design.

Supplies You Will Need: 


  • A dotting tool: if you don't have a dotting tool you can use a bobby pin, a pen, or anything small and circular!
  • Nail art brush: it's best if you have one like mine where it is long and thin. You could use a tooth pick but it will be much harder. 
  •  Black sheer polish: continue reading to see how you make one!
  • Black polish: I'm using Rimmel London Hot Black to Go.
  • Matte top coat: this is optional but I like this design best with a matte finish!
How To Make a Sheer Black Polish: 


 Making a sheer black polish is a really easy thing to do! You will need a bottle of top coat and some black polish. All you need to do is drip the black polish into the top coat like I did shown above. Every 5-10 drops of black polish you drip in, you should put on the cap and shake it. Continue doing this until you have to black to clear ratio that you want. I didn't count but I think I put around 30 drops of black into it. 

Sheer Polish Design:

Step One: Paint your nails two coats of your new sheer polish. You may want to do more or less coats depending on how sheer your polish is.


Step Two: Take your dotting tool and make dots on your nails. A good idea is if your nails have stains on them that the sheer black polish didn't cover up, then cover the stain up with a dot!


Step Three: Take your brush and outline around your nail. This part takes a lot of practice. You can see that I messed up a lot and painted on my cuticles instead. It's okay though because that is really easy to fix! You just take a small angled brush with acetone to clean up the excess.


Step Four: Clean up your cuticles with acetone and finish with a matte top coat! Like I said before the matte top coat is optional but I really like the smoky effect that it gives the design.

I hope you liked this tutorial! Let me know if you guys want tutorials more often. If you recreate the look share it with me on Facebook, Twitter, or Instagram! Use the hashtag #apolishedbookworm. Have a great day!

Sunday, June 14, 2015

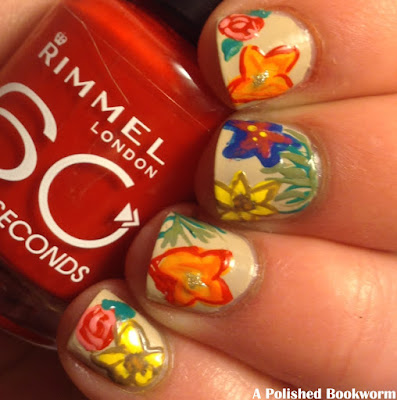
Some Free Hand Flowers For You!

Hey guys! I hope you all are having a great weekend! I have been really lazy this weekend and that is how I like it. I am currently reading A Court of Thorns and Roses by Sarah J. Maas. It is perfect.

Today I have some free hand floral nail art for you! I did these a few weeks ago. While they aren't perfect, and they are really messy I love them anyways. I was inspired to do a floral by Wondrously Polished's beautiful florals! This design wasn't inspired by one of her designs particularly but scrolling through her designs made me inspired to create some flowers of my own. I used a ton of polishes for this design so I won't bore you and name them all. If you want to know about any of the polishes, please ask me in the comments!


Friday, May 22, 2015

#31DC2 Days 29, 30, & 31

Hey there. You know that sweet relief when you finally finish something? I finally finished drivers ed today and I am so happy to get back into blogging again! I really want to finish up this 31 Day Challenge 2.0. So today I have three different nail designs for you all. I should have a challenge wrap up later today or sometime over the weekend.

Day 29 Inspired By A Polish

I say inspired by a polish extremely loosely. More like a color combo. But I had a different design already done for this day, but I hated it and decided not to put it up. I have been kind of obsessed with the gray/yellow/teal/black combo lately. I free handed this nail art with a nail art brush. I used Nicole By OPI Hit the Lights, some unnamed LA colors teal colors, NYC Black Lace Creme, Revlon Bare Bones, and NYC French White Tip.


Day 30 Tape or Nail Vinyls

I have always wanted to do this rainbow block kind of design. So here we are. I used a ton of polishes for this. If you have any questions about them, ask me in the comments.


Day 31 Recreate Your Favorite Challenge

My favorite challenge was day 12 when I did my intricate design. This one didn't turn out as good but I love how retro it is. I free handed this design,


Tuesday, May 5, 2015

#31DC2 Day 28 Studs

Hey guys! Today I have day 28 of the 31 Day Challenge 2.0 for you. Today's prompt is studs. I really don't have a lot of options when it comes to studs, but I do have some pretty ones from The New Black. I used Revlon Bare Bones as a base for all of my nail art. For the stud nails I used the gold square studs from The New Black over some flaky glitter that I bought from the dollar store. The roses are painted in Sinful Colors Beau Khaki, NYC Sunset Park, and NYC Tropicoral.


Copyright © 2014 A Polished Bookworm